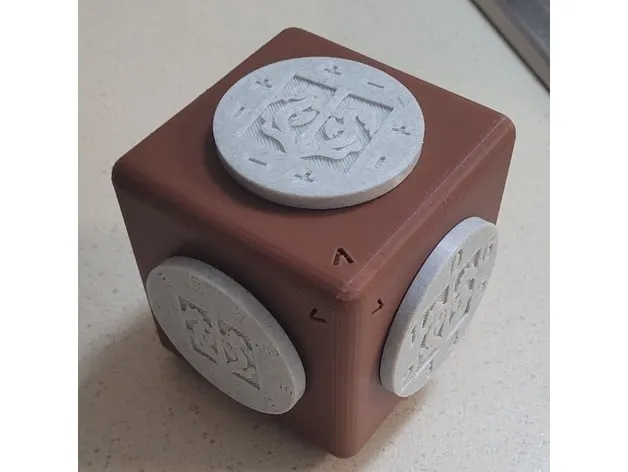
The One Dice by nothing19
The One Dice
the one dice takes the place of all dice and make each roll completely fair with no inconsistency like standard dice.
are you ready to upgrade you dice to the one.
6 dice in one .
How to print and prepare files.
The program we are using is cura 5.4.0 for this project.
step 1
open cura and make shore you have these add-ons.
mesh tools (needed if you wish to customize dice faces)
calibration shapes (needed for benchmark printer if needed)
to install add-ons click the marketplace button in cura (top right) and find the add-ons in the list.
step 2
Preparing your files.
We are going to make the in-print (embossed) for the pointer on the cube.
open stamp pointer v2 .stl
click on the model
In the left hand side menu click on Move. de-select drop down model. Set the X and Y to 0mm and the Z to -2mm.
In the left hand side menu click on per model setting. In the drop out menu click on Modify settings for overlaps. In the drop down menu select cutting mesh. click on select setting button.
select these settings in the menu
Wall Thickness
Wall Line Count
Top/Bottom Thickness
Infill Density
click on Close
set all values to 0
click on file (top left of cura )in the drop down menu click on open file.
Fined body 80mm v1.stl from the projects files. select file and click open
click on the model 80mm v1 in cura
In the left hand side menu click on Move.Set the X and Y to 0mm and the Z to 0mm.
make shore the pointer and the cube alignment is correct. the pointer should be on all 6 side body 80mm v1.
slice and check the stamping of the surface worked.
slicing setting.
infill 15% to 80%
layer high 0.2mm
nozzle 0.4mm
supports yes (use tree supports from build plate only)
wall line count 3 to 4
build plate adhesion (whatever suits your build plate)
first layer speed 15mm/s (slow and steady wins the race)
And send to printer.
step 3
We are going to prepare the Stamps for the Face.
open in cura
any of the stamp faces.
click on the model
In the left hand side menu click on Move.
select drop down model.
Set the X and Y to 0mm .
In the left hand side menu click on per model setting.
In the drop out menu click on Modify settings for overlaps.
In the drop down menu select cutting mesh.
click on select setting.
select these seeings
Wall Thickness
Wall Line Count
Top/Bottom Thickness
Infill Density
click on Close
set all values to 0
click on file (top left of cura )in the drop down menu click on open file.
Fined stamp middle dragon from project files.
select file and click open,
In the left hand side menu click on Move.
select drop down model.
Set the X and Y to 0mm .
In the left hand side menu click on per model setting.
In the drop out menu click on Modify settings for overlaps.
In the drop down menu select cutting mesh.
click on select setting.
select these seeings
Wall Thickness
Wall Line Count
Top/Bottom Thickness
Infill Density
click on Close
set all values to 0
click on file (top left of cura )in the drop down menu click on open file.
Fined Face Blank v1 or Face Blank v2 from project files.
select file and click open,
click on the model to highlight it in cura
In the left hand side menu click on Move.Set the X and Y to 0mm and the Z to 0mm.
make shore the alignment is correct. slice and check the stamping of the surface worked.
slicing setting.
infill 15% to 80%
layer high 0.2mm
nozzle 0.4mm
supports yes (use tree supports with support placement set to everywhere)
wall line count 3 to 4
build plate adhesion (whatever suits your build plate)
first layer speed 15mm/s (slow and steady wins the race)
And send to printer.
step 4
Printed Bearings and Bearing Seat tool.
warning printed bearing can fuse and become unusable (dont let this worry you)
open Bearing Setter v1.stl and open bearings 608 x6 v1.stl
slicing setting.
infill 15% to 80%
layer high 0.2mm
nozzle 0.4mm
supports No
wall line count 3 to 4
build plate adhesion (whatever suits your build plate)
first layer speed 15mm/s (slow and steady wins the race)
slice and send to print.
check first layer and up to layer 5 for fusion and elephant footing during printing .
if bearing are not working for you.
you can use 608 standard bearings.
step 5
press bearings in with bearing seat tool.
press the bottom shaft of the face in to the mid bearing. If lose use glue.
enjoy.
notes
all can be printed on a single build plate of 220m x220mm.
place 6x stamps of you choice (modify as instructed by step 3).
place 6 x face models( aliment to the stamps ).
place 1x stamp pointer v2 (modify as instructed by step 2),
place 1x body 80mm v1 ( aliment to the stamp pointer )
place 1x Bearing Setter v1
place 1x Bearings 608 x6 v1
slicing setting.
infill 15% to 80%
layer high 0.2mm
nozzle 0.4mm
supports yes (use tree supports with support placement set to everywhere)
wall line count 4
build plate adhesion (whatever suits your build plate)
first layer speed 15mm/s (slow and steady wins the race)
Bearings
https://www.thingiverse.com/thing:4821342
In Development.
no support version.
More middle stamps.
d12 dice face.
v2 face with reeded edge complete.
investigation of print in place for this project.
re-right instruction.
reducing file size but retaining details.