Ender 3 Manta MK2 BMG cable chain system by dcipub
YOUR PRINTER MUST BE CONFIGURED FOR SENSORLESS HOMING.
THE CHAIN LINKS MUST BE PRINTED AT 150% SCALE.
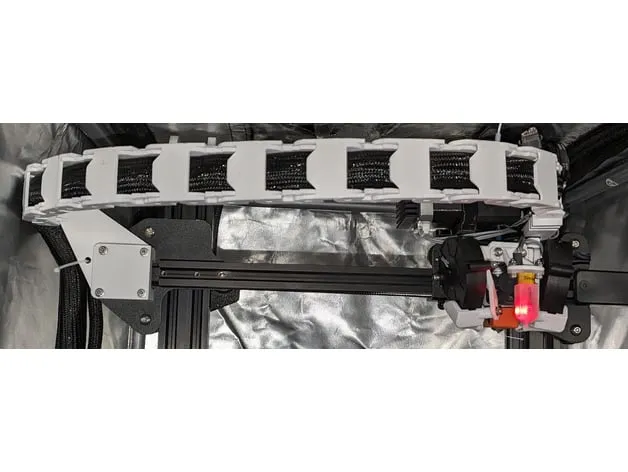
My Ender 3v2's stock wires kept breaking internally so I replaced them all with heavier-gauge wire. As a consequence of this added weight and thickness, cable management became a problem. This cable chain system is the solution I came up with. It's composed of 3 parts:
1) X-axis chain mount - Replaces the stock limit switch mounting bracket. I've eliminated limit switches from my Ender 3 and rely only on sensorless homing, so there's no limit switch mounting point present in this model. A hole is provided for use with a cable tie to secure the cables in place.
2) Tool head carriage chain mount - This mounts on top of the BMG Direct Drive Head from BoothyBoothy's Manta MK2 Tool Head (Direct_Drive_Head_BMG_V1_2.stl). It requires 1 longer screw, M3x12, and using an M3 washer is highly recommended. Two cable ties are recommended to secure the cables in place.
3) Cable Chain Link - Taken as-is from johnnywhiskey's "Ender 3 Cable Chain". In my photo you can see I originally used his "V2" links, but his bidirectional "V3" links are actually a better choice for this project so that's the version I included. Both work equivalently, but the V3 version is less likely to pinch cables when (mis)used for my purpose. THESE MUST BE PRINTED AT 150% SCALE. You will need 19 for a setup like mine, but I recommend printing 21 to have a couple spares or in case you decide to lengthen the chain. When assembling the links, reverse every second link to avoid needing any of the top clips from johnnywhiskey's original project.
The parts are oriented in the intended printing direction and no supports should be used.
To ensure good fitment, at least low or medium fan should be used for all pieces, especially when printing the chain links. On the x-axis limit switch mount replacement piece, bridge settings should be enabled with high fan to minimize internal drooping.